
Automate Your Load Planning: EasyCargo Now Integrates with Make.com
Managing cargo and logistics involves countless repetitive tasks – entering shipment data, checking if cargo will fit into trucks or containers, and ensuring loads comply with weight and size regulations. What if you could automate the manual data entry behind these processes and focus on the strategic decisions that truly matter?
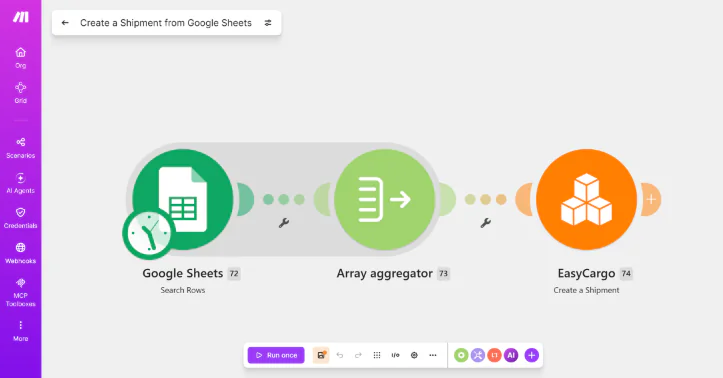
While cargo planning software like EasyCargo already handles these operations, we’re now taking the next step to make our EasyCargo API accessible through a simplified, no-code approach that’s gaining tremendous popularity alongside AI-driven solutions.
We’re excited to announce that EasyCargo now integrates with Make, bringing powerful no-code automation to your cargo load planning workflow. This integration opens up the possibility of streamlining your EasyCargo operations without writing a single line of code. It’s the perfect solution to harness EasyCargo’s API capabilities, allowing you to control aspects of your EasyCargo account from within Make.
Make is a visual automation platform that connects your favorite apps and services like EasyCargo. Think of it as the digital assistant that handles your routine tasks while you sleep. With its intuitive drag-and-drop interface, you can create automated workflows – called “scenarios” – that trigger actions across different platforms based on specific conditions.
Now, with EasyCargo integrated into Make, you can automate your cargo planning workflow. Automatically import cargo items from Excel, create shipments, and sync planning data across all of your systems using visual workflows. Automate repetitive tasks, save valuable time, and eliminate errors in your cargo planning process.
What Can You Automate with EasyCargo + Make?
The possibilities are endless, limited only by our EasyCargo API capabilities. Here are some practical examples to spark your imagination:
Administration Workflows
- Retrieve and share calculated shipment reports: Automatically fetch existing report details or public links to share with clients or stakeholders.
- Retrieve all users with EasyCargo account access: Keep track of who has account access and automatically create new user accounts with assigned roles.
Load Planning Workflows
- Extract cargo item placement data: Pull optimization results into your ERP or reporting systems for further analysis.
- Import cargo items into your database: Streamline recurring shipments by automatically loading standard cargo configurations.
- Create cargo spaces directly from Google Sheets: Let your team enter new container specifications in spreadsheets to automatically create cargo spaces in EasyCargo.
How the Integration Works
EasyCargo’s Make integration operates through two main components:
Triggers (What starts the automation)
Think of triggers as the “when” part of your automation. A workflow can be triggered to perform actions in EasyCargo when:
- A new row is added to Google Sheets, or an existing row is updated with new items
- A specific time arrives – you can even set how often it occurs
- A message is received
- An email is received
- An online meeting starts
- A selected Google Doc is updated with text
Actions (What gets automated)
Actions are the “then” part of your automation. For example, Make can perform these EasyCargo actions:
- Create new users with designated Administrator or User roles
- Retrieve existing shipment reports
- Generate shareable public links for calculated load plans
- Save cargo item templates to your account for later use
- Add a new shipment to your EasyCargo account
- Create new cargo spaces
- List and retrieve shipments, cargo spaces, cargo item templates, and users for use in your system
- Get the cargo item placement for a given shipment to see exactly how items are loaded
Data Flow
The integration allows data to flow both ways, so not only can you send information to EasyCargo, but you can also use the results in your external systems.
This two-way integration gives you flexibility: you can generate reports, track cargo placements, and manage users directly from EasyCargo, while also keeping your other tools in sync by pushing new data into the system.
Getting Started
Find EasyCargo on Make.com
Search for “EasyCargo” in Make’s search bar to get started, or access it directly here.
Quick Start Templates
We’ve prepared several ready-to-use scenarios to help you get up and running quickly:
- Create a Shipment from Google Sheets: Create a new draft shipment in your EasyCargo account using spreadsheet rows, ready for your team to open and load in the web app.
- Create Cargo Item Templates from Google Sheets: Bulk-create reusable master item definitions (dimensions, weights, and constraints) in your EasyCargo account directly from spreadsheet data.
- Create Cargo Spaces from Google Sheets: Add new cargo spaces to your account using specifications from Google Sheets. Please note that for now, only CargoSpaceTypes.Container is supported.
Documentation and Support
- Make How-To Guides: Comprehensive how-to guides for setting up and configuring scenarios.
- EasyCargo and Make Integration Documentation: Step-by-step instructions for setting up the EasyCargo modules in Make and using them in your workflows.
- EasyCargo API: Detailed technical documentation covering our API endpoints and the logic behind our pre-built Make templates.
- EasyCargo Help Center: In case you need our assistance.
Example Scenario: Create a Shipment from Google Sheets
Let’s walk through a complete example that many logistics companies find valuable.
The Goal: When a potential customer stores data about their items in Google Sheets or another spreadsheet file, a single click to trigger the relevant scenario will create a shipment in their EasyCargo account.
Step 1: Create a Google Sheets File
First, create a Google Sheets file to enter data about your items. In the image below, you can see an example of what the content should look like. Make sure to include all of the columns shown: Group Name, Item Description, Pieces, Width, Height, Length, Total Weight, Is Stackable?, Is Tiltable?, and Is Rotatable?.
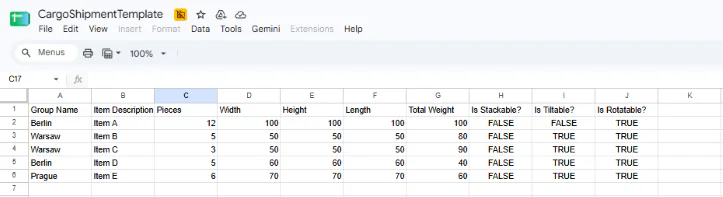
To make things easier, we’ve prepared a ready-to-use Google Sheets template that you can copy and start working with right away. Keep the columns as they are and fill in the rows with the details of the shipment you want to load into EasyCargo.
Step 2: Set up the First Module – Google Sheets
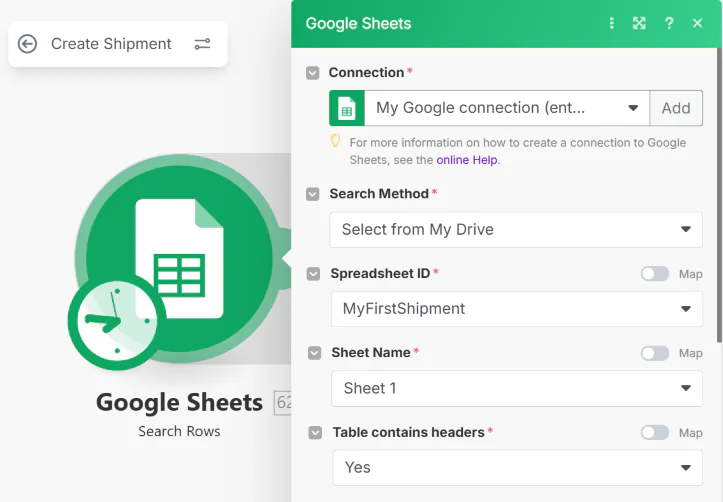
Now, in your Make account, use the template scenario to create a shipment. Add a connection by signing in to your Google account where you added your file in the previous step. After specifying the connection, choose the other properties so that Make has access to your file and can work with it.
Step 3: Adjust the Array Aggregator
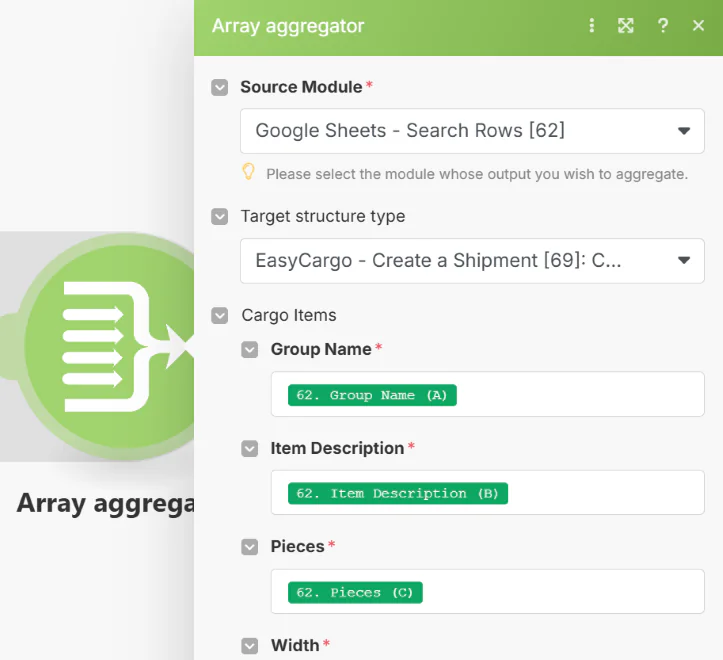
The second module of the scenario aims to map and store your cargo items from your Google Sheets file in a convenient way. Make sure to specify the corresponding values from Google Sheets so that Make knows which property to set for which value in your file.
Step 4: Set up the EasyCargo ‘Create a Shipment’ Module
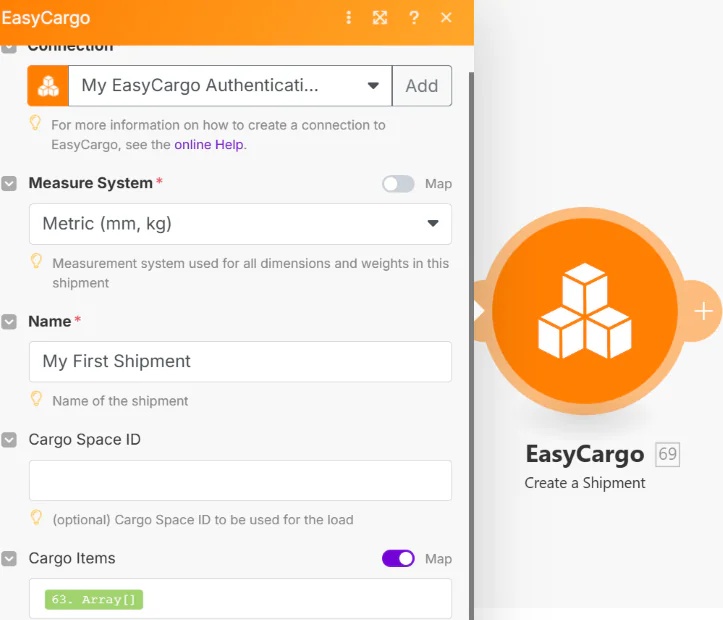
Finally, in the last module of the scenario, add the connection again by signing in to your EasyCargo account. Specify the name of your shipment and pass the outcome array from the previous step into the Cargo Items property so that a shipment can be created. If you do not specify the cargo space, then a 20′ HC container will be used by default.
Step 5: View Your Shipment in EasyCargo
Run the complete scenario and then open your EasyCargo account. Under the Shipments & Reports tab, you can see a row with your freshly created shipment. In the last column of the row, press the Open shipment icon. Then press the Load button to see your shipment.
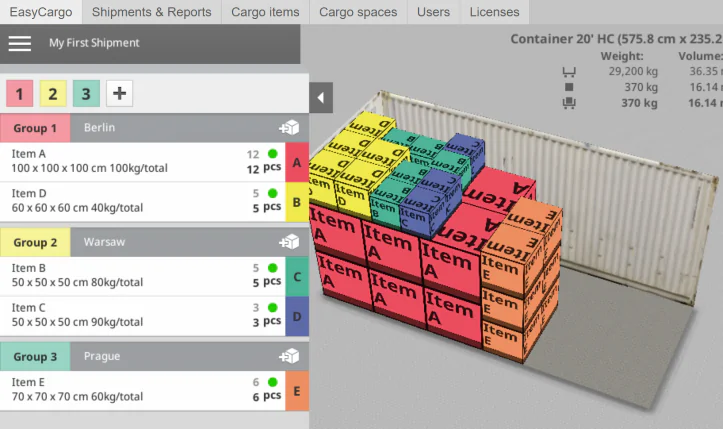
Result: If you keep track of your cargo items in spreadsheets, then it’s just a few clicks to create shipments from them in EasyCargo so that you can see the optimized loading plans.
Tips and Best Practices
When setting up automations with EasyCargo, a few simple strategies can help you get the most out of your workflows. From starting small and testing carefully to choosing the right app combinations, these tips will save you time, reduce errors, and make your processes run smoothly.
Start Small and Test Thoroughly
- Begin with simple scenarios before building complex workflows.
- Always test your automations with sample data first.
- Set up error notifications so you know if something goes wrong.
Useful App Combinations
We recommend starting by experimenting with EasyCargo workflows using some well-known external systems. These apps are great for triggering automations and can also store workflow results. Some popular options to try include:
- Google Workspace: Sheets, Docs, Gmail, Calendar, Forms
- Microsoft 365: Excel, Outlook
- CRM Systems: Capsule, Pipedrive, HubSpot
- Communication Tools: Slack, Discord, Microsoft Teams
Monitoring, Optimization, and Data Verification
To keep your automations reliable and efficient, it’s important to regularly review your logs, track the time saved and the errors reduced, and gradually expand scenarios that work well into more complex cases. Always keep backups of your working automations, and put checks in place to ensure data quality. Validation steps, fallback actions for edge cases, and testing with different input formats will help prevent issues. Finally, monitor for synchronization problems so that your data stays accurate and consistent across systems.
Ready to Automate Your Logistics Workflow?
The EasyCargo and Make integration represents a significant step toward automated logistics operations. By extending your EasyCargo workflow with the Make integration, you can eliminate manual data entry, reduce errors, and seamlessly integrate EasyCargo with other apps and services.
Whether you’re processing dozens or thousands of shipments per month, automation can help you scale your operations without proportionally scaling your workload.
What will you automate first? The possibilities are limited only by your imagination and our EasyCargo API – and we can’t wait to see the creative solutions you build. Visit Make.com and search for the EasyCargo module to get started, or contact our support team for assistance with setting up your first automated scenario.